Love this? Save it for later!
Share the inspiration with your friends
Introduction
My roommate swore by store-bought pickles for years. A crunchy, tangy snack? Sure, but homemade pickles? “Too much fuss,” she’d say with a skeptical grin. Then one rainy Sunday afternoon, I whipped up this Easy Tangy Dill Refrigerator Pickles recipe—no boiling water baths, no jars lined up on the counter, just a quick mix and a bit of patience in the fridge. A few days later, I caught her sneaking a jar from the back of the fridge, fork in hand, clearly hooked.
Honestly, this recipe is a game changer for anyone who thought pickling was a weekend-long ordeal. It’s tangy, crisp, and so simple you can make it after work and have a fresh batch ready in less than a week. I remember the mess I made the first time—cucumber slices flying off the cutting board, spilled brine on the counter—but it was worth every drop of cleanup. Maybe you’ve been there, doubting you’ll ever get that perfect balance of sour and salty without a canner staring you down. Let me tell you, this method makes you forget all about traditional pickling drama.
What’s stuck with me is how this recipe fits into everyday life—quick, fuss-free, and delicious enough to turn a pickle skeptic quiet. It’s the kind of recipe you keep coming back to, and I’m glad to share it with you.
Why You’ll Love This Recipe
Having tested many pickle recipes over the years, I can say this Easy Tangy Dill Refrigerator Pickles recipe stands out for several reasons. It’s been family-approved and kitchen-tested, making it a reliable go-to that doesn’t disappoint.
- Quick & Easy: Ready to eat in just 5 minutes of prep, with no canning required—ideal for busy weeknights or spontaneous cravings.
- Simple Ingredients: Uses pantry staples and fresh cucumbers; no need for specialty stores or complicated spice mixes.
- Perfect for Snacking or Sandwiches: Adds that perfect tangy crunch to lunches, BBQs, and casual get-togethers.
- Crowd-Pleaser: Even pickle skeptics have been converted after trying these crisp, flavorful slices.
- Unbelievably Delicious: The dill and garlic create a lively, fresh flavor that’s both bright and comforting.
What sets this recipe apart is the balance of acidity and herbs without the wait or worry of traditional canning. The brine is perfectly seasoned for a tang that’s lively but not overpowering. Trust me, it’s the kind of recipe that makes you close your eyes after the first bite and say, “Okay, that’s really good.”
What Ingredients You Will Need
This recipe uses simple, wholesome ingredients that deliver bold flavor and satisfying crunch without fuss. Most are pantry staples, and the fresh dill brings that unmistakable aroma and taste.
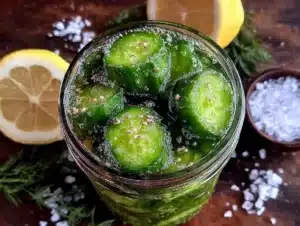
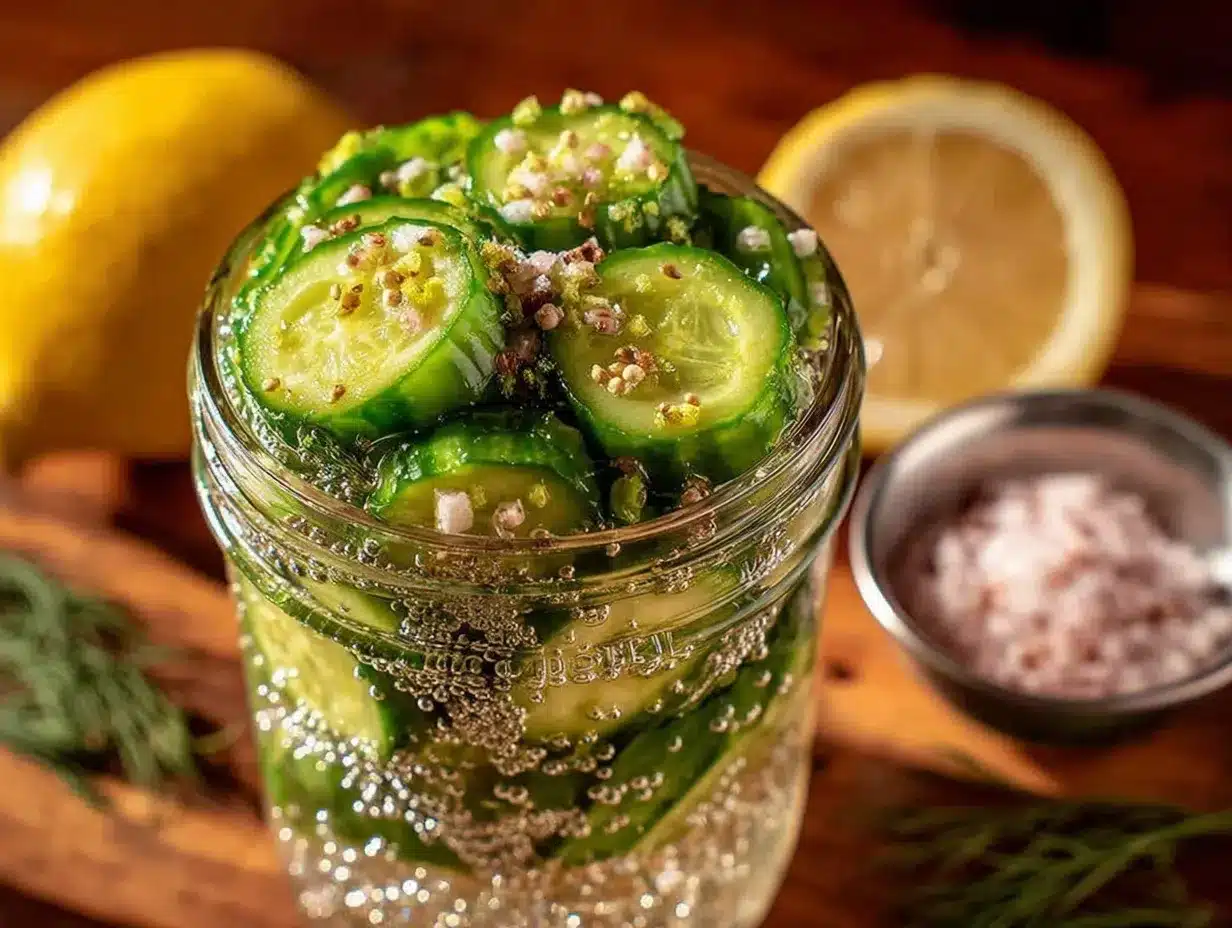
- Cucumbers: 4 to 5 medium Kirby cucumbers, sliced into ¼-inch thick rounds or spears (Kirbys are best for crunch)
- Fresh Dill: 4 to 5 sprigs (or 2 tablespoons dried dill if fresh isn’t available)
- Garlic Cloves: 3 cloves, peeled and lightly crushed (adds aromatic punch)
- White Vinegar: 1 cup (240 ml) – I recommend Heinz or Bragg for reliable acidity)
- Water: 1 cup (240 ml) – filtered or tap is fine
- Salt: 1 tablespoon kosher salt (Diamond Crystal preferred for dissolving)
- Sugar: 1 tablespoon granulated sugar (balances the tartness)
- Black Peppercorns: 1 teaspoon whole peppercorns (optional for subtle spice)
- Red Pepper Flakes: ½ teaspoon (optional, for a mild kick)
Substitutions: Use apple cider vinegar if you prefer a slightly sweeter tang. For a low-sodium option, reduce salt to ½ tablespoon but expect a milder flavor. If you’re avoiding garlic, a pinch of garlic powder can substitute.
Equipment Needed
- Large mixing bowl or measuring jug (for combining brine)
- Sharp knife and cutting board (for slicing cucumbers)
- Measuring spoons and cups (to get those vinegar and salt amounts right)
- Clean quart-sized glass jar or airtight container (for storing pickles in the fridge)
- Optional: Tongs or fork (to handle pickles without making a mess)
If you don’t have glass jars, BPA-free plastic containers work well too. I’ve tried mason jars and simple recycled pickle jars—both work fine as long as they seal tightly. For cleanup, a quick soak in warm soapy water does the trick.
Preparation Method
- Prepare the cucumbers: Wash and dry your Kirby cucumbers thoroughly. Slice them into your preferred shape—rounds about ¼ inch thick or spears. I like spears for sandwiches, but rounds work great for snacking. This step takes about 5 minutes.
- Mix the brine: In a large mixing bowl or jug, combine 1 cup (240 ml) white vinegar, 1 cup (240 ml) water, 1 tablespoon kosher salt, and 1 tablespoon sugar. Stir until the salt and sugar are fully dissolved. This usually takes about 2 minutes. If you notice any undissolved salt, give it a little warm water to help.
- Pack the jar: Place fresh dill sprigs, garlic cloves, peppercorns, and red pepper flakes (if using) at the bottom of your clean jar. Then pack the cucumber slices tightly but without crushing. Don’t overfill; leave about an inch of headspace.
- Pour the brine: Carefully pour the prepared brine over the cucumbers, ensuring they’re fully submerged. Use a clean utensil (like a chopstick or spoon handle) to press down gently if necessary. Leaving cucumbers exposed can lead to spoilage.
- Seal and refrigerate: Close the jar tightly and place in your fridge. Let sit for at least 24 hours, although the flavor really develops after 3 days. The pickles will keep well for up to 2 weeks.
Pro tip: If you want extra crispness, soak the cucumber slices in ice water for 30 minutes before pickling. Also, if the brine tastes too sharp the first day, give it time—flavors mellow and balance out with chilling.
Cooking Tips & Techniques
One of the trickiest parts of making pickles is getting that perfect crunch without canning. Here’s what I’ve learned from trial and error over the years:
- Choose the right cucumber: Kirby cucumbers are your best bet for crispness. Avoid cucumbers with soft spots or wrinkles.
- Don’t skip the salt and sugar: They balance acidity and help preserve texture. I once tried skipping sugar, and the pickles tasted too harsh.
- Use fresh dill: Dried can work, but fresh dill is what really makes the flavor pop. I keep a small pot on my windowsill just for pickling.
- Submerge fully: Keep cucumbers covered in brine to avoid mold. I use a small glass weight or clean stone to keep everything under.
- Patience is key: While you can eat them after 24 hours, letting them sit 3-5 days enhances flavor and texture.
Timing is flexible here; you can prep in the evening and have pickles ready for lunch a few days later. If you’re juggling dinner prep, slice cucumbers during downtime to save time.
Variations & Adaptations
This recipe is super adaptable, making it easy to suit your taste or dietary needs:
- Spicy Dill Pickles: Add 1 sliced jalapeño or increase red pepper flakes for heat lovers. I once added smoked paprika for a smoky twist that surprised my friends.
- Garlic-Free Version: Replace garlic cloves with a teaspoon of dried dill seed for a milder flavor.
- Low-Sodium Pickles: Cut salt in half and add a splash of lemon juice for brightness.
- Seasonal Twist: Swap some cucumbers for carrot sticks or green beans for variety in texture and color.
- Vegan Adaptation: This recipe is naturally vegan, but double-check vinegar brands if you’re strict about ingredients.
For a different method, you could try fermenting cucumbers, but that takes days and more attention. This recipe keeps it simple and accessible.
Serving & Storage Suggestions
Serve these tangy dill pickles chilled straight from the fridge. They’re fantastic as a snack, side with sandwiches, or topping on burgers and hot dogs. The crunch and tang add a refreshing contrast that livens up any meal.
Store pickles in their brine in the refrigerator, tightly sealed. They’ll stay crisp and delicious for about two weeks. If you notice any cloudiness in the brine or off smells, it’s time to discard.
Reheating isn’t recommended—these pickles are best enjoyed cold or at room temperature. Flavors deepen the longer they chill, so if you can wait, the taste gets even better after a few days.
Nutritional Information & Benefits
These Easy Tangy Dill Refrigerator Pickles are low in calories and fat, making them a guilt-free snack. Each serving (about ¼ cup) contains roughly:
| Nutrient | Amount |
|---|---|
| Calories | 10 |
| Carbohydrates | 2g |
| Fiber | 1g |
| Sodium | 550mg |
Key benefits include probiotics when naturally fermented (though this recipe is quick pickled, not fermented), and antioxidants from fresh dill. They’re gluten-free, vegan, and fit well into low-carb diets. Just watch the sodium if you’re salt-sensitive.
Conclusion
This Easy Tangy Dill Refrigerator Pickles recipe proves that homemade pickling doesn’t have to be intimidating or time-consuming. It’s a reliable, fresh, and flavorful addition to your kitchen routine, perfect for turning simple cucumbers into a tangy treat. I love how it fits into busy days without fuss, and I hope you find it just as satisfying.
Feel free to tweak the spices or try the variations to make it your own. And if you give it a go, I’d love to hear how your batch turns out or any creative twists you add—drop a comment below or share your experience!
Happy pickling!
FAQs
How long do refrigerator pickles last?
Refrigerator pickles typically last up to 2 weeks when stored properly in an airtight container in the fridge.
Can I use regular vinegar instead of white vinegar?
Yes, you can substitute apple cider vinegar for a slightly sweeter flavor, but avoid flavored or malt vinegars as they can alter the taste.
Do I need to peel the cucumbers?
Nope! Leaving the skin on adds extra crunch and nutrients. Just wash them thoroughly.
Can I make these pickles without garlic?
Absolutely. You can omit garlic or substitute with dill seed or garlic powder for a milder flavor.
Will these pickles be as crunchy as canned pickles?
While they won’t be exactly like canned ones, using fresh Kirby cucumbers and keeping them submerged in brine helps keep them crisp and satisfying.
Pin This Recipe!
Easy Tangy Dill Refrigerator Pickles Recipe 5-Minute No Canning Guide
A quick and easy recipe for tangy, crunchy dill refrigerator pickles that require no canning and are ready to enjoy in just a few days.
- Prep Time: 5 minutes
- Cook Time: 0 minutes
- Total Time: 24 hours to 3 days (for best flavor)
- Yield: About 4 cups pickles (approximately 4 servings) 1x
- Category: Snack
- Cuisine: American
Ingredients
- 4 to 5 medium Kirby cucumbers, sliced into ¼-inch thick rounds or spears
- 4 to 5 sprigs fresh dill (or 2 tablespoons dried dill)
- 3 garlic cloves, peeled and lightly crushed
- 1 cup (240 ml) white vinegar
- 1 cup (240 ml) water
- 1 tablespoon kosher salt
- 1 tablespoon granulated sugar
- 1 teaspoon whole black peppercorns (optional)
- ½ teaspoon red pepper flakes (optional)
Instructions
- Wash and dry Kirby cucumbers thoroughly. Slice into ¼-inch thick rounds or spears (about 5 minutes).
- In a large mixing bowl or jug, combine 1 cup white vinegar, 1 cup water, 1 tablespoon kosher salt, and 1 tablespoon sugar. Stir until salt and sugar are fully dissolved (about 2 minutes).
- Place fresh dill sprigs, garlic cloves, peppercorns, and red pepper flakes (if using) at the bottom of a clean quart-sized glass jar or airtight container.
- Pack cucumber slices tightly into the jar without crushing, leaving about an inch of headspace.
- Pour the prepared brine over the cucumbers, ensuring they are fully submerged. Use a utensil to press down gently if needed.
- Seal the jar tightly and refrigerate. Let sit at least 24 hours; flavor develops best after 3 days. Pickles keep well up to 2 weeks.
Notes
For extra crispness, soak cucumber slices in ice water for 30 minutes before pickling. Let pickles sit 3-5 days for best flavor. Keep cucumbers fully submerged in brine to avoid spoilage. Use Kirby cucumbers for best crunch. Adjust salt and sugar to taste or dietary needs.
Nutrition
- Serving Size: About ¼ cup (1 servi
- Calories: 10
- Sugar: 1
- Sodium: 550
- Carbohydrates: 2
- Fiber: 1
Keywords: refrigerator pickles, dill pickles, quick pickles, no canning, easy pickles, tangy pickles, crunchy pickles, homemade pickles