Love this? Save it for later!
Share the inspiration with your friends
I was standing in my kitchen last Tuesday, staring at a pack of chicken thighs I’d pulled from the freezer that morning, when the smell of garlic butter drifting from my neighbor’s open window hit me. And suddenly I was twenty-three again, renting that tiny apartment above the laundromat, watching Mrs. Kowalski through her ground-floor window as she browned chicken in a cast iron skillet. She’d wave me in sometimes, and I’d sit on her cracked vinyl stool while she told me about Warsaw and showed me how butter and garlic could transform anything. I haven’t thought about her in years. But that smell—rich, golden, and impossibly comforting—sent me straight to the fridge for butter and a head of garlic.
Here’s the thing about this recipe: it started as a desperate weeknight experiment. I had chicken thighs, a sad bunch of broccoli, some carrots that were looking a little tired, and honestly, zero energy for multiple pans. I wanted something that tasted like Mrs. Kowalski’s cooking—like someone had spent hours layering flavors—but I needed it on the table in forty minutes. So I threw everything on one sheet pan, slathered it with garlic butter, and crossed my fingers.
The first bite made me laugh out loud. It was that good. The chicken came out tender with crispy, golden edges. The vegetables caramelized in that garlicky butter sauce until they were almost candy-sweet. And the best part? One pan to wash. Maybe you’ve been there—standing in your kitchen, exhausted, wanting something that feels special without the fuss. This is that recipe. It’s the one that stayed with me, the one I’ve made for friends who asked for the recipe before they finished eating, the one that reminds me of Mrs. Kowalski’s tiny kitchen and the simple magic of butter and garlic.
Why You’ll Love This Recipe
Let me tell you why this one-pan garlic butter chicken thighs recipe has become my most-requested dish. I’ve tested it at least a dozen times—burned the garlic once, undercooked the carrots another time—and what I’m sharing with you is the perfected version. It’s the kind of recipe that makes you look like a hero with almost no effort.
- One Pan, Minimal Mess : Everything cooks together on a single sheet pan or skillet. That means less scrubbing and more time actually enjoying your meal. I mean, who wants to wash a pile of dishes after cooking?
- Simple Ingredients : You probably have most of these in your kitchen right now. Butter, garlic, chicken thighs, and whatever vegetables are hanging out in your crisper drawer. No fancy grocery trips required.
- Ready in 40 Minutes : From prep to plate, this comes together fast. Perfect for those evenings when you’re hungry now, not in an hour.
- Budget-Friendly : Chicken thighs are affordable, and you can use whatever vegetables are on sale. This recipe stretches your grocery dollar without skimping on flavor.
- Guaranteed Crowd-Pleaser : I’ve served this to picky eaters, vegetable skeptics, and serious food lovers. Everyone goes back for seconds. The garlic butter sauce is honestly addictive.
- Endlessly Adaptable : Swap in seasonal vegetables, adjust the herbs, or make it dairy-free. The method works with whatever you have on hand.
What makes this recipe different from every other chicken thigh recipe out there? It’s the technique. Instead of just tossing everything with oil, you make a real garlic butter sauce that coats every piece of chicken and every vegetable. The chicken gets seared first for that golden-brown crust, then it finishes cooking surrounded by vegetables that soak up all those buttery juices. It’s not just another sheet pan dinner—it’s the best version of one.
Honestly, this recipe is the kind that makes you close your eyes after the first bite. It’s comfort food reimagined—faster, simpler, but with the same soul-soothing satisfaction. Perfect for impressing guests without stress, or turning a Tuesday night into something memorable.
What Ingredients You Will Need
This recipe uses simple, wholesome ingredients to deliver big flavor without the fuss. Most are pantry staples, and I’ve included substitution notes so you can work with what you have.
For the Garlic Butter Sauce
- Unsalted butter, 4 tablespoons (½ stick), softened (I use Kerrygold for its rich flavor, but any good butter works)
- Fresh garlic, 5-6 cloves, minced (don’t use jarred garlic here—fresh makes a real difference in the sauce)
- Fresh parsley, 2 tablespoons, chopped (plus more for garnish)
- Dried thyme, 1 teaspoon (or 1 tablespoon fresh thyme leaves)
- Salt, 1 teaspoon, plus more to taste
- Black pepper, ½ teaspoon, freshly ground
- Paprika, 1 teaspoon (sweet or smoked, adds beautiful color and warmth)
For the Chicken
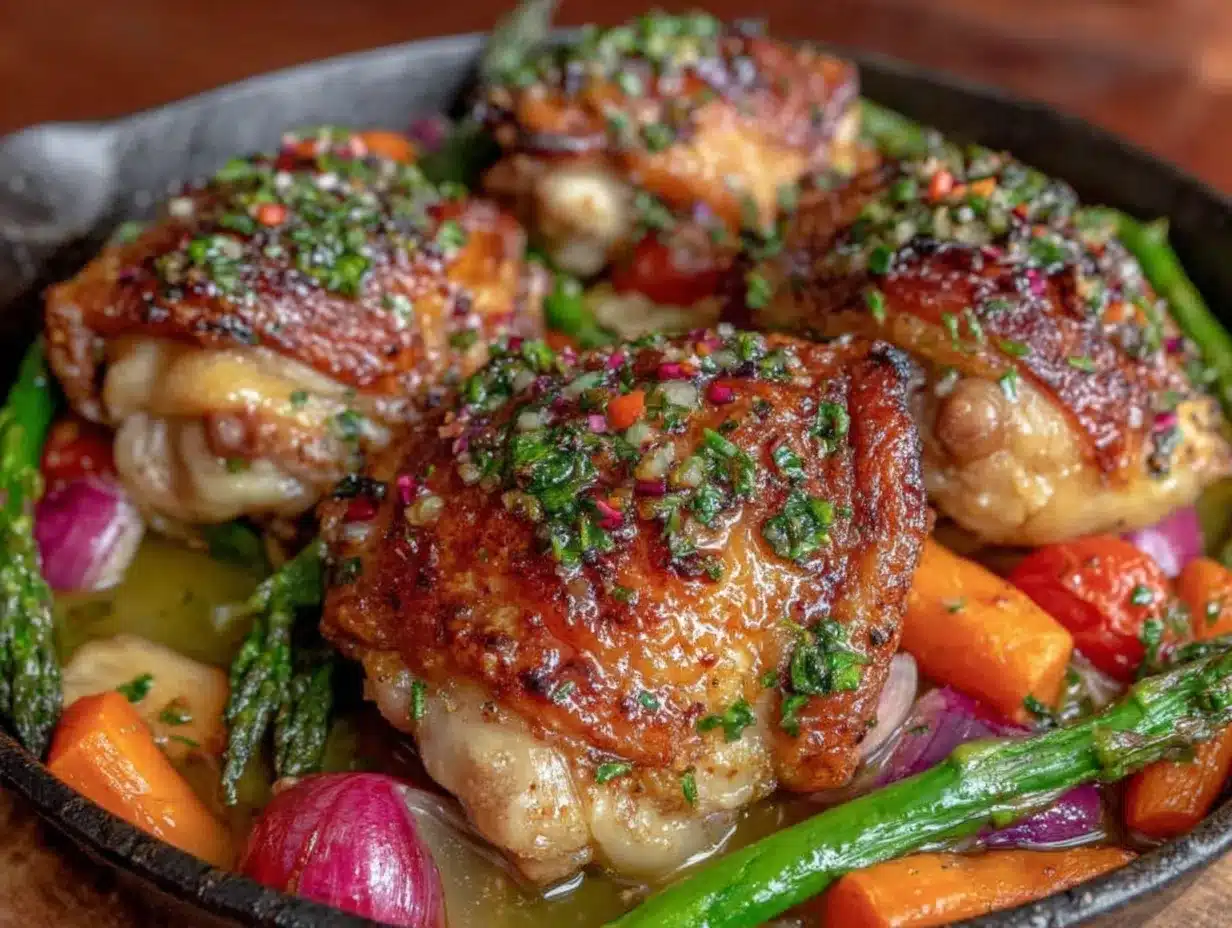
- Bone-in, skin-on chicken thighs, 4-6 pieces (about 2 pounds total). The skin gets wonderfully crispy, and the bones keep the meat juicy. You can use boneless thighs, but reduce cooking time by about 10 minutes.
- Olive oil, 1 tablespoon (for searing the chicken)
For the Vegetables
- Broccoli florets, 2 cups (about 1 medium crown, cut into bite-sized pieces)
- Carrots, 3 medium, peeled and cut into 2-inch sticks (or use baby carrots for convenience)
- Red bell pepper, 1 large, sliced into 1-inch strips (adds sweetness and color)
- Red onion, 1 medium, cut into wedges (don’t chop too small—they’ll cook down)
- Zucchini, 1 medium, halved lengthwise and sliced into half-moons (optional, great in summer)
Ingredient Selection Tips : Look for chicken thighs with the skin still attached—it protects the meat and gets beautifully crispy. For the best garlic butter, use fresh garlic cloves, not pre-minced. The flavor is noticeably brighter. If you’re using dried herbs, crush them between your palms before adding to release their oils.
Substitution Guidance : No broccoli? Use green beans or asparagus. Swap carrots for sweet potatoes (cut into 1-inch cubes). For a dairy-free version, use vegan butter or olive oil mixed with a splash of nutritional yeast for that savory note. If you’re avoiding nightshades, skip the bell pepper and add extra zucchini or mushrooms.
Equipment Needed
You don’t need a fancy kitchen for this recipe. Here’s what you’ll need:
- Large oven-safe skillet or sheet pan (12-inch cast iron skillet is ideal, but any oven-safe pan works. A rimmed baking sheet is a great alternative if you don’t have a skillet)
- Small bowl (for mixing the garlic butter)
- Chef’s knife and cutting board (for prepping vegetables and mincing garlic)
- Tongs (for flipping the chicken—much easier than a spatula)
- Measuring spoons
- Pastry brush or spoon (for spreading the garlic butter)
I’ve made this recipe with both a cast iron skillet and a half-sheet pan. The cast iron gives the chicken a better sear and keeps everything hotter, but the sheet pan is easier for fitting larger quantities. If you’re using a sheet pan, line it with parchment paper for even easier cleanup. And here’s a tip I learned the hard way: make sure your pan is large enough to hold everything in a single layer. If the pieces are crowded, they’ll steam instead of getting golden and crispy.
Preparation Method
- Preheat your oven to 400°F (200°C). Position the rack in the middle of the oven. While it heats, let your chicken thighs sit at room temperature for about 15 minutes—this helps them cook more evenly.
- Make the garlic butter. In a small bowl, combine the softened butter, minced garlic, chopped parsley, dried thyme, salt, pepper, and paprika. Mash everything together with a fork until it’s well combined and smells amazing. Set aside at room temperature. (Pro tip: if your butter is too cold to mix, microwave it for 5-10 seconds—just don’t melt it completely.)
- Prep your vegetables. Wash and cut the broccoli into florets, peel and slice the carrots, seed and slice the bell pepper, cut the onion into wedges, and slice the zucchini if using. Try to keep the pieces roughly the same size so they cook evenly. Place all vegetables in a large bowl.
- Pat the chicken thighs dry with paper towels. This is really important—dry skin gets crispy. Season both sides with a pinch of salt and pepper. Don’t skip this step; it builds the foundation of flavor.
- Heat olive oil in your oven-safe skillet over medium-high heat until it shimmers. Carefully place the chicken thighs skin-side down. Let them cook without moving for 5-6 minutes—the skin should turn deep golden brown and release easily from the pan. (If it sticks, it needs another minute.)
- Flip the chicken thighs using tongs and cook for another 2 minutes on the other side. Remove the chicken to a plate and set aside. Don’t wipe out the pan—those browned bits are pure flavor.
- Toss the vegetables with half the garlic butter. Add the prepared vegetables to the same skillet (or transfer to your sheet pan). Spoon half of the garlic butter over the vegetables and toss to coat. Spread them in an even layer.
- Nestle the chicken thighs back into the pan, skin-side up, on top of the vegetables. Spoon the remaining garlic butter over each chicken thigh, making sure to get some on the skin.
- Roast for 25-30 minutes, or until the chicken reaches an internal temperature of 165°F (74°C) and the vegetables are tender and caramelized. The skin should be crispy and golden, and the juices should run clear when you pierce the thickest part of the thigh.
- Let it rest for 5 minutes before serving. This allows the juices to redistribute throughout the meat. Spoon some of the pan juices over the chicken and vegetables before serving. Garnish with extra fresh parsley if you like.
Sensory Cues : When the chicken is searing, you should hear a steady sizzle—if it’s quiet, your pan isn’t hot enough. The kitchen should smell richly of garlic and butter as it roasts. The vegetables should be fork-tender with browned edges, and the chicken skin should be crackling-crisp when you bite into it.
Cooking Tips & Techniques
I’ve made this one-pan garlic butter chicken thighs recipe more times than I can count, and I’ve learned a few things along the way. Here are my best tips for getting it right every time.
Don’t skip the sear. I know it’s tempting to just throw everything in the oven and call it a day, but that initial sear on the stovetop is what gives the chicken its gorgeous golden crust. That browning creates deep, savory flavor through the Maillard reaction—fancy science talk for “it tastes better.” The first time I made this, I was in a hurry and skipped the sear. The chicken was fine, but it wasn’t great. Never again.
Watch your garlic. Fresh garlic can burn easily, especially in a hot oven. That’s why we mix it into the butter rather than sprinkling it on top—the butter protects it from direct heat. If you’re using a sheet pan, try to keep the garlic butter on top of the chicken rather than letting it pool on the pan where it might burn.
Give your vegetables space. Crowding the pan is the number one mistake I see home cooks make. If the vegetables are piled on top of each other, they’ll steam instead of caramelizing. Use the largest pan you have, and if necessary, use two pans. The caramelization is worth the extra pan.
Check for doneness early. Ovens vary, and your chicken might be done a few minutes before or after the suggested time. I always start checking at the 20-minute mark with an instant-read thermometer. Chicken thighs are forgiving—they stay juicy even if they go a few degrees over—but you want that perfect 165°F (74°C) for food safety.
Let the pan rest. After the chicken comes out of the oven, let it sit for 5 minutes before serving. I know it’s hard to wait, but those few minutes allow the juices to redistribute so every bite is tender and moist. Plus, the vegetables continue to absorb all that garlic butter goodness.
Variations & Adaptations
One of my favorite things about this recipe is how flexible it is. Here are some variations I’ve tried and loved:
Seasonal Vegetable Swaps
In spring, try asparagus tips and snap peas. Summer calls for zucchini, yellow squash, and cherry tomatoes. Fall is perfect for cubed butternut squash and Brussels sprouts (halved). Winter? Root vegetables like parsnips, turnips, and potatoes work beautifully. Just adjust cooking times for denser vegetables—add root veggies 10 minutes earlier, or cut them smaller.
Herb and Spice Variations
Swap the thyme for rosemary or oregano for a different flavor profile. Add a pinch of red pepper flakes to the garlic butter for heat. Try smoked paprika instead of sweet for a deeper, almost bacon-like flavor. I once made this with za’atar spice blend mixed into the butter, and it was incredible—earthy, tangy, and completely unexpected.
Dietary Adaptations
Dairy-free : Use vegan butter or a generous drizzle of good olive oil mixed with a tablespoon of nutritional yeast for that savory, buttery note. Low-carb/Keto : This recipe is naturally low-carb as written. Swap carrots for more broccoli or cauliflower. Gluten-free : This recipe is naturally gluten-free—just double-check your spice blends for any hidden additives.
Different Cooking Methods
If you’re short on time, you can cook everything in the same skillet on the stovetop. Sear the chicken, remove it, cook the vegetables in the pan for 5-7 minutes, then nestle the chicken back in, cover, and cook on low for 15-20 minutes until done. The vegetables won’t be as caramelized, but it’s faster. For a grill version, cook the chicken and vegetables in a foil packet over medium heat for about 25 minutes—perfect for summer cookouts.
Serving & Storage Suggestions
This dish is best served hot, straight from the oven. I like to spoon the pan juices over everything right before serving—that garlic butter sauce is liquid gold. A sprinkle of fresh parsley or a squeeze of lemon juice right at the end brightens all the flavors beautifully.
What to serve with it : This is a complete meal on its own, but if you want to stretch it, serve over rice, quinoa, or crusty bread to soak up the juices. A simple green salad with lemon vinaigrette makes a nice contrast to the rich, buttery chicken. For a heartier meal, add roasted potatoes or mashed cauliflower on the side.
Storage : Leftovers keep well in an airtight container in the refrigerator for up to 4 days. The flavors actually deepen overnight—I often think this dish tastes even better the next day. To reheat, place in a 350°F (175°C) oven for 10-15 minutes, or until heated through. The microwave works in a pinch, but the oven helps the skin get crispy again.
Freezing : This recipe freezes beautifully. Let everything cool completely, then transfer to freezer-safe containers or bags. It will keep for up to 3 months. Thaw overnight in the refrigerator, then reheat in a 350°F oven until warmed through. I like to freeze individual portions for easy lunches.
Meal Prep Tip : Make a double batch on Sunday and portion it out for the week. The chicken stays juicy, and the vegetables hold up well. It’s my go-to for busy weeks when I know I won’t have time to cook.
Nutritional Information & Benefits
Here’s the approximate nutritional breakdown for one serving (based on 4 servings, using one chicken thigh and a generous portion of vegetables):
| Nutrient | Amount per Serving |
|---|---|
| Calories | 420 |
| Protein | 32g |
| Fat | 28g |
| Saturated Fat | 12g |
| Carbohydrates | 14g |
| Fiber | 4g |
| Sugar | 6g |
| Sodium | 680mg |
This recipe is packed with nutrition. Chicken thighs are rich in protein, B vitamins, and selenium, which supports immune function and thyroid health. The variety of vegetables provides a rainbow of antioxidants—beta-carotene from carrots, vitamin C from bell peppers and broccoli, and fiber to keep you full and satisfied. Garlic is known for its anti-inflammatory and immune-boosting properties. And while butter gets a bad rap, it’s a source of fat-soluble vitamins A, D, E, and K, which help your body absorb nutrients from the vegetables.
From a dietary perspective, this recipe is naturally gluten-free and low-carb. If you’re watching your saturated fat intake, you can reduce the butter to 2 tablespoons or swap half for olive oil. The protein and fiber make this a satisfying meal that won’t spike your blood sugar.
Conclusion
This one-pan garlic butter chicken thighs with vegetables has become my go-to for so many reasons. It’s the recipe I turn to when I want something that feels special but don’t have the energy for a complicated production. It’s the dish I make for friends when I want to impress them without breaking a sweat. And honestly, it’s the meal I crave on those evenings when only something warm, buttery, and deeply comforting will do.
I hope you’ll make this your own. Swap in your favorite vegetables, adjust the herbs to what you have on hand, and don’t be afraid to double the garlic butter (I won’t tell). The beauty of this recipe is that it’s forgiving—it works with whatever you’ve got and still turns out delicious. That’s the kind of recipe worth keeping in your back pocket.
When you make it—and I really hope you do—come back and let me know how it went. Did you use different vegetables? Add extra spice? Forget to sear the chicken and still loved it? I want to hear about your version. Leave a comment below or tag me in your photos. Until then, happy cooking, and may your kitchen always smell like garlic butter.
Frequently Asked Questions
Can I use chicken breasts instead of thighs?
Yes, but be careful. Chicken breasts cook faster and can dry out more easily. Use boneless, skinless breasts and reduce the roasting time to 18-22 minutes. Check the internal temperature at 160°F (71°C) and let carryover cooking bring it to 165°F (74°C).
Do I have to sear the chicken first?
Technically no, but I really recommend it. That golden-brown crust adds so much flavor and texture. If you’re truly short on time, you can skip it—just increase the roasting time by 5-8 minutes and expect less crispy skin.
Can I prep this ahead of time?
Absolutely! You can make the garlic butter up to 3 days ahead and keep it in the fridge. Prep the vegetables and store them in a sealed container. When you’re ready to cook, just sear the chicken and assemble everything. It makes weeknight dinner so much easier.
What if I don’t have an oven-safe skillet?
No problem. Sear the chicken in any skillet, then transfer everything to a rimmed baking sheet lined with parchment paper. Roast as directed. The vegetables might caramelize even better on a sheet pan since they have more surface area exposed to the heat.
How do I know when the vegetables are done?
The vegetables should be fork-tender with caramelized edges. Broccoli should be bright green and slightly charred at the tips. Carrots should be easily pierced with a fork but not mushy. If your vegetables are done before the chicken, you can remove them to a plate and let the chicken finish cooking alone.
Pin This Recipe!

One-Pan Garlic Butter Chicken Thighs with Veggies
A quick and easy one-pan meal featuring tender, crispy-skinned chicken thighs and caramelized vegetables in a rich garlic butter sauce. Ready in 40 minutes with minimal cleanup, this budget-friendly recipe is perfect for busy weeknights.
- Prep Time: 15 minutes
- Cook Time: 30 minutes
- Total Time: 45 minutes
- Yield: 4 servings 1x
- Category: Main Course
- Cuisine: American
Ingredients
- 4 tablespoons unsalted butter, softened
- 5–6 cloves fresh garlic, minced
- 2 tablespoons fresh parsley, chopped (plus more for garnish)
- 1 teaspoon dried thyme
- 1 teaspoon salt, plus more to taste
- ½ teaspoon freshly ground black pepper
- 1 teaspoon paprika (sweet or smoked)
- 4–6 bone-in, skin-on chicken thighs (about 2 pounds)
- 1 tablespoon olive oil
- 2 cups broccoli florets
- 3 medium carrots, peeled and cut into 2-inch sticks
- 1 large red bell pepper, sliced into 1-inch strips
- 1 medium red onion, cut into wedges
- 1 medium zucchini, halved lengthwise and sliced into half-moons (optional)
Instructions
- Preheat your oven to 400°F (200°C). Position the rack in the middle of the oven. Let chicken thighs sit at room temperature for about 15 minutes.
- In a small bowl, combine softened butter, minced garlic, chopped parsley, dried thyme, salt, pepper, and paprika. Mash together with a fork until well combined. Set aside at room temperature.
- Wash and cut broccoli into florets, peel and slice carrots, seed and slice bell pepper, cut onion into wedges, and slice zucchini if using. Place all vegetables in a large bowl.
- Pat chicken thighs dry with paper towels. Season both sides with a pinch of salt and pepper.
- Heat olive oil in a large oven-safe skillet over medium-high heat until shimmering. Place chicken thighs skin-side down and cook without moving for 5-6 minutes until deep golden brown.
- Flip chicken thighs using tongs and cook for another 2 minutes on the other side. Remove chicken to a plate and set aside. Do not wipe out the pan.
- Toss the prepared vegetables with half the garlic butter in the same skillet (or transfer to a sheet pan). Spread in an even layer.
- Nestle the chicken thighs back into the pan, skin-side up, on top of the vegetables. Spoon remaining garlic butter over each chicken thigh.
- Roast for 25-30 minutes, until chicken reaches an internal temperature of 165°F (74°C) and vegetables are tender and caramelized.
- Let rest for 5 minutes before serving. Spoon pan juices over chicken and vegetables. Garnish with extra fresh parsley if desired.
Notes
For best results, don’t skip the sear—it creates a golden crust. Use fresh garlic for the brightest flavor. Ensure vegetables are in a single layer to avoid steaming. Check chicken doneness early with an instant-read thermometer. Let the pan rest for 5 minutes before serving.
Nutrition
- Serving Size: 1 chicken thigh with
- Calories: 420
- Sugar: 6
- Sodium: 680
- Fat: 28
- Saturated Fat: 12
- Carbohydrates: 14
- Fiber: 4
- Protein: 32
Keywords: one-pan chicken, garlic butter chicken, sheet pan dinner, chicken thighs, easy weeknight dinner, roasted vegetables